Go to Reviews.org AU Edition
How to Boost and Extend Your Wi-Fi Signal
We are committed to sharing unbiased reviews. Some of the links on our site are from our partners who compensate us. Read our disclosure policies to learn more.
Slow internet can be a real headache, especially if you use your home Wi-Fi to get work done or study for school. Luckily, there are some free and easy steps you can take to improve your Wi-Fi.
We put these steps to the test to create this guide on how to boost your home Wi-Fi signal or extend it across your home. So let’s dig in and see if we can solve your problem.

We’ve got more tips to help you speed up your internet connection and start zooming through the internet.
1. Take an internet speed test
Taking an internet speed test isn’t necessarily a solution to your slow Wi-Fi woes, but it can help you identify where the problem lies.
See how your internet speed is performing with our free speed test tool.
If your internet speed test results are much slower than the speeds promised by your ISP, start with these free Wi-Fi speed boost tips. If you still hit a slow Wi-Fi roadblock after that, it’s time to call your ISP to see if the problem is on its end.
We recommend taking a speed test while connecting your computer, tablet, or laptop to your router with an Ethernet cable in order to get the most accurate results. But if you can only connect through Wi-Fi, no worries. You’ll still get a good idea of how well your internet speed is performing.
2. Reposition your router and its antennas
You might prefer keeping your router hidden inside a cabinet or tucked away in a bookshelf. But if your Wi-Fi signal is suffering, keeping your router out of sight and out of mind could be the cause.
Here’s the ideal placement for your router:
- Located in the center of your home for the best coverage
- Surrounded by open air to remove interference and avoid overheating
- Not located near electronic devices, appliances, or metal objects
- If possible, placed up high on a shelf or with a mount
A central location for your router is critical if you want to boost your Wi-Fi coverage even in the corners of your home.
This might be difficult if you’ve got only one outlet to plug your equipment into. But it’s worth the small hassle of running cables along walls to be able to stream Netflix in your bedroom or set up your home office in the dining room.
Sometimes running cables just isn’t an option. If that’s the case in your home, try to place your router as close to any areas where you usually need an internet connection or as close to the devices you use the most.
Aside from a central location, making sure your router is surrounded by open air and not near other electronic devices is another important step to take to avoid signal interference bogging your Wi-Fi down.
Your kitchen is home to most of the appliances that will disrupt your home Wi-Fi signal. But other big offenders include washers and dryers, TVs, cordless phones, and some heaters. So avoid setting up your router near any of these devices if possible.
Look for studs, too, if your Wi-Fi signal isn’t getting to every nook and cranny in your house. Some homes use metal studs instead of wood, and you should use a stud finder to make sure your router isn’t located next to any.
Strategically aim your router’s antennas
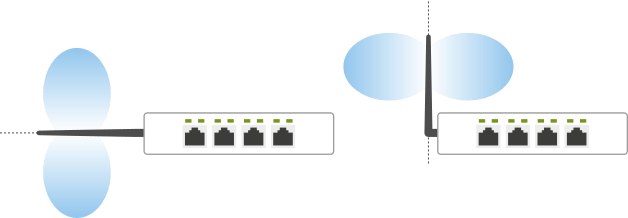
You might think that your router’s antennas should both stick straight up, but you might improve your Wi-Fi signal and range by moving them around.
Most modern routers have omnidirectional antennas, so they broadcast a Wi-Fi signal in a direction that’s perpendicular to the antenna itself.

Source: KurthElectronic.de
Here’s how to position external router antennas to power up your Wi-Fi signal:
- If you live in a single-story home, point your antennas straight up.
- If you live in a multi-story home, point half of your antennas straight up and the other half of your antennas at an angle or parallel to your floor.
If your router came with internal antennas, all you need to do is make sure you stand it up the way it’s meant to sit. So don’t flip your router on its side if it’s meant to stand tall and proud.
3. Update your router’s firmware
Keeping your equipment’s firmware up to date can improve your internet speeds and also up your security. Most routers let you update your firmware within the main administration panel, so it’s easy to download the new file and install it.

Source: Asus.com
If you’ve got a modem-router combo or router that your internet provider gave you, you may not need to update your firmware. My Xfinity Gateway doesn’t have a firmware update option because Xfinity keeps it automatically updated.
Each brand of router has a different way to login to your settings, so it’s best to search for the brand and model of router you own and follow the official guide.
4. Change your Wi-Fi frequency and channel
After you update your router’s firmware, take a peek at your Wi-Fi frequency and channel settings. Both of these are also found on your router’s settings page, and adjusting them could give your Wi-Fi a burst of speed.
Which is better, 2.4 GHz or 5 GHz Wi-Fi frequency?
Swapping from 2.4 GHz to the 5 GHz frequency could speed up your Wi-Fi. On the other hand, if you need to boost your Wi-Fi range, swapping to 2.4 GHz is a better solution.
Here’s a quick look at how the two Wi-Fi frequencies compare and which one is best for which devices.
2.4 GHz Wi-Fi frequency
- Longer range, but slower max speeds than 5 GHz frequency
- Can be crowded, resulting in lower speeds
- Best choice for smart home devices, like light bulbs and thermostats, and security cameras
5 GHz Wi-Fi frequency
- Faster max speeds, but shorter range than 2.4 GHz frequency
- Usually less crowded, which lowers interference that can slow Wi-Fi down
- Best choice for work computers, gaming consoles, and cell phones
If your devices refuse to connect to the right frequency, there might be a workaround. Check out Craig’s tips for switching Wi-Fi frequencies on your smart home devices.
Change the Wi-Fi channel
Did you know your router comes with channels? Similar to frequencies, if your router is set to a channel that multiple other devices are using, your Wi-Fi speeds will suffer.
Most countries use channels 1, 6, 11, and 14, but chances are your router is set to a default channel, either 1 or 6. If this is the case, your router is competing with other Wi-Fi devices using the same channel, which causes a logjam and pumps the brakes on your Wi-Fi speeds.

NetSpot Android app screenshot courtesy of author.
You can use apps or even built-in diagnostic tools to find the best, least crowded Wi-Fi channel. Here are some tools we recommend:
- Windows: NetSpot free version
- Mac: Wireless Diagnostics tool
- iOS: AirPort Utility app
- Android: NetSpot app
- Linux: “iw wlan0 scan” command
Once you find the least congested Wi-Fi channel, log into your router’s settings panel and swap to that channel.
Heads up: Some routers will automatically select your Wi-Fi channel for you, like my Xfinity xFi Gateway. Even though I can’t select the least congested channel, the router should do that for me.

Screenshot courtesy of author.
5. Give Wi-Fi leeches the boot
If your Wi-Fi network is public or you use an easy-to-guess password, chances are someone, not something, is causing your Wi-Fi traffic jam.
Sure, you might feel like a good neighbor, but if your buddy down the street is re-downloading their entire Steam video game library, you’ll see a slowdown. And you can add security and privacy issues to that slogfest if a stranger is latched onto your Wi-Fi network.
You can easily give any unwanted devices or users the boot by changing your Wi-Fi password. That way you’ll need to enter your new password on any device you want connected to Wi-Fi—and unwanted devices and users will be left high and dry.
If you’d rather double-check that uninvited guests are using your Wi-Fi before you change your password, you can use apps or your router’s settings interface to see who’s on your Wi-Fi network. The free app we like most is Fing, which works with both Android and iPhone devices.

Fing Android app screenshot courtesy of author.
If you don’t recognize a device right away, try walking around your house to see if any connected devices might fit the name or ask others in your home what it might be. I wasn’t sure what the device “ut.comcast.net” was in the screenshot above until I asked my partner.
Some routers and internet providers also have device management settings that can identify the devices on your network. Here are some ISP apps and router device management guides we’ve run across:
Most modern routers come with Quality of Service (QoS) settings. This allows you to prioritize certain devices’ Wi-Fi connections over others, meaning that in times of heavy web traffic, your prioritized devices should run more smoothly.
Check out this guide on how to set up QoS on your router—and don’t tell your partner your laptop is prioritized over theirs. *wink*
6. Upgrade your router
An old router might be the blockage in your Wi-Fi network. If yours is more than a few years old, it might be time to upgrade. Especially since newer routers feature modern Wi-Fi protocols with faster max speeds.
A newer router might also come with extras like beamforming and Multiple-User, Multiple-Input, Multiple-Output (MU-MIMO), which improve signal strength and allow more devices to use your Wi-Fi at the same time without diminishing signal quality.
We talk more about how beamforming and MU-MIMO can up your Wi-Fi game in our guide to choosing a router. And you can check out our favorite Spectrum and Xfinity Wi-Fi routers, including the TP-Link Archer A20 that comes packed with Wi-Fi enhancing features.
7. Use a Wi-Fi extender or mesh Wi-Fi system
Sometimes you need an extra piece of equipment to pull that Wi-Fi signal to the farthest corners of your house.
When I visited my parents, I was so frustrated by the weak Wi-Fi signal in the guest bedroom that I bought them a TP-Link N300 Wi-Fi extender. Like magic, I could finally stream Netflix without the buffering icon crashing the party.
Similarly, a friend bought a NETGEAR Orbi mesh Wi-Fi system to make sure the Wi-Fi signal was strong throughout his two-story house.
Both Wi-Fi extenders and mesh Wi-Fi systems are an excellent way to extend the reach of your Wi-Fi. But depending on your situation, one might be a better option than the other. Here’s how they generally compare:
Wi-Fi extenders
- Cheaper option
- Repeats your router’s Wi-Fi signal in order to extend the range
- Inefficiencies could slow down your Wi-Fi speeds
- Requires you to manually select the extender’s Wi-Fi network if you move around the house
Mesh Wi-Fi networks
- More expensive
- Can replace your old router to create a Wi-Fi network
- More efficient than extenders
- Automatically select the strongest Wi-Fi signal as you move around the house
8. Upgrade your internet plan
If your Wi-Fi speed is still sputtering after all those hacks, it might be time to upgrade your internet plan.
Why? Well, your internet provider advertises a speed for your internet plan, but often we don’t actually get those speeds at home. Thanks to interference and other issues no one can control, you’ll probably see speeds slower than what your ISP advertises.
Another reason might be that you have more devices and people using your Wi-Fi network than before. More devices and people require faster internet speeds (or bandwidth).
We’ll help you take a look at your internet speed test results in step one and decide if you need more internet speed. And as for maximum speeds, we’ve done the math on over a million speed test results to determine which ISPs are the fastest.
These are some of the most common reasons why your internet is slow. Have a look and try the hacks to see if you can whip it into working order before you call your ISP.

Find out which internet providers are best (and why).
Related Articles


